上一篇教程中,我们已经学习了Core Animation中3D绘图的基本方法。这篇教程,我们准备深入一些,讲讲如何创建一个可交互的3D场景。我们将会创建一个类似于旋转木马的3D场景界面,用户可以通过拖拽手势来旋转界面。

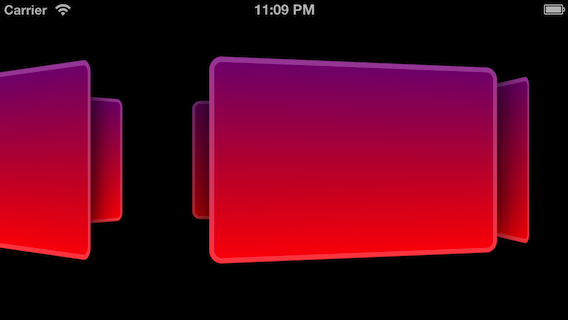
可能你已经在上一篇教程中见过最终APP的样子了,但是,让我们再来看一次吧:

你可以直接下载教程的源代码。本篇教程的源代码和上一篇教程中的源代码在同一个代码仓库里面,但是我做了一些修改,为这篇教程建立了一个新的target。

概述

这个程序,我们把工作分成了以下几个部分。

3D

因为我们需要3D效果,所以我们需要使用一个透视视图来进行绘制工作。为了构造旋转木马效果,我们将会建立一个3D层次体系。正如前一篇教程中介绍过的,用CATransformLayer来做层次体系中的根是不错的选择。

平面

旋转木马效果由一系列平面构成。我们将使用CAGradientLayer来表示这些平面。CAGradientLayer是CALayer的一个子类,用它可以制作渐变背景色,会比纯色背景要好看一些。

我们会对这些平面进行一些平移和旋转操作,使它们沿着旋转木马的圆周排列。

手势

获取用户的手势非常简单。我们只需要使用一个手势识别器(Gesture Recognizer)就可以了。然后,我们追踪用户的动作,将手势数据转换成角度值,用这个角度值来旋转界面。

好了,现在你应该已经知道这个项目有哪些东西要完成了吧?启动XCode吧!

写代码吧

展开项目中的TB_3DPlanes文件夹,然后打开ViewController.m文件。

我们从viewDidLoad这个函数开始:

- (void)viewDidLoad
{
[super viewDidLoad];
//Initialize the TransformLayer
transformLayer = [CATransformLayer layer];
transformLayer.frame = self.view.bounds;
[self.view.layer addSublayer:transformLayer];
angle = 0;
XPanOffset = 0;
//Create 5 planes
[self addPlane];
[self addPlane];
[self addPlane];
[self addPlane];
[self addPlane];
//Force the first animation to set the planes in place
[self animate];
//Initialize the Pan gesture recognizer
UIPanGestureRecognizer *panGesture = [[UIPanGestureRecognizer alloc]initWithTarget:self action:@selector(pan:)];
[self.view addGestureRecognizer:panGesture];
}

或许这个函数中有许多东西你还不完全明白是什么意思。但是,确实从这里开始就是核心部分的代码了。你可以暂时不用在这里纠结,继续阅读,后面会解释这些代码的意思的。

很显然,我们先用CATransformLayer创建了一个根图层对象(transformLayer),然后我们用addPlane函数向场景中添加了5个平面,并且我们将用pan:函数来处理拖拽手势。

绘制平面

addPlane函数的代码也是相当直观的。它只是用CAGradientLayer和一些参数创建了一个图层罢了。然后将图层添加到了transformLayer上.

/** A simple function to create a CAGradientLayer **/
- (void)addPlane{
CGSize planeSize = CGSizeMake(250, 150);
//Initialize the layer
CAGradientLayer *layer = [CAGradientLayer layer];
//Set the frame and the anchorPoint
layer.frame = CGRectMake(480/2 - planeSize.width/2, 320/2 - planeSize.height/2 -20, planeSize.width, planeSize.height);
layer.anchorPoint = CGPointMake(0.5, 0.5);
//Set borders and cornerRadius
layer.borderColor = [[UIColor colorWithWhite:1.0 alpha:0.3]CGColor];
layer.cornerRadius = 10;
layer.borderWidth = 4;
//Set the gradient color for the plane background
layer.colors = [NSArray arrayWithObjects:
(id)[UIColor purpleColor].CGColor,
(id)[UIColor redColor].CGColor,
nil];
layer.locations = [NSArray arrayWithObjects:
[NSNumber numberWithFloat:0.0f],
[NSNumber numberWithFloat:1.0f],
nil];
//Set the shadow
layer.shadowColor = [[UIColor blackColor]CGColor];
layer.shadowOpacity = 1;
layer.shadowRadius = 20;
//The double side has to be setted if we want to see the plane when its face is turned back
layer.doubleSided = YES;
//Add the plane to the transformLayer
[transformLayer addSublayer:layer];
}

这里唯一需要解释一下的是doubleSide属性。将它设置成YES,表示我们希望图层的背面也被绘制出来。当一个平面在Y轴上旋转接近180度的时候,我们仍然可以在场景中看到它,只是它旋转到了相反的方向。

为了更形象地说明这个问题,可以看看下图doubleSide为NO和YES时的对比。

看了图,一下就明白了吧?设置成NO的时候,被旋转到背对着我们的那些平面都不会被绘制出来。

也许你已经注意到了,在viewDidLoad函数中我们添加了5个平面,但是这些平面并不是按位置排列在场景中的。在addPlane函数中,它们被添加到了同一个位置(参见frame属性)。

更新平面位置

在viewDidLoad函数里,平面被创建后,我们调用了animate方法。这个函数的主要作用是更新各个平面的位置。这里是我们第一次调用这个函数,这个时候并没有发生任何触摸事件,这里调用它只是为了让各个平面沿着旋转木马的圆周排列好。

我们来看看这个函数的代码:

/** This function performs the transformation on each plane **/
- (void)animate{
//Define the degrees needed for each plane to create a circle
float degForPlane = 360 / [[transformLayer sublayers] count];
//The current angle offset (initially it is 0... it will change through the pan function)
float degX = angle;
for (CALayer *layer in [transformLayer sublayers]) {
//Create the Matrix identity
CATransform3D t = CATransform3DIdentity;
//Setup the perspective modifying the matrix elementat [3][4]
t.m34 = 1.0f / - 1000.0f;
//Perform rotate on the matrix identity
t = CATransform3DRotate(t, degToRad(degX), 0.0f, 1.0f, 0.0f);
//Perform translate on the current transform matrix (identity + rotate)
t = CATransform3DTranslate(t, 0.0f, 0.0f, 250.0f);
//Avoid animations
[CATransaction setAnimationDuration:0.0];
//apply the transoform on the current layer
layer.transform = t;
//Add the degree needed for the next plane
degX += degForPlane;
}
}

其中,defForPlane变量是指沿着360度圆周上每个平面需要旋转的角度。看下图会容易理解一些:

圆周上的5个平面需要旋转一定的角度。这个角度从0开始,每个平面增加”360/平面总数”度。

angle变量的值目前还是零,我们稍后会详细解释它的作用。

animate函数循环遍历transformLayer的所有子图层(5个平面),为每一个平面加上一些变换效果:

第一个变换效果是改变视点,和我们在上一篇教程中的做法一样,直接给m34属性赋一个值,从而可以绘制出平面的3D空间深度。

另外2个变换效果需要一点点数值计算。我们前面已经谈到了,每个平面需要一个旋转角度。但是我们跳过了一个关键点,还没讲。

如果我们只是给每个平面加上一个旋转角度,我们只会得到下面这种效果:

你可以看到,这种效果不行,我们还需要给每个平面加上平移变换,使让它们沿着圆周排列。

最后一步是将这些变换应用到各个平面上。只需要将变换赋值给当前平面的transform属性就可以了,赋值后,下一个平面的degX值会增加“degForPlane”度。

拖拽手势

pan:函数是拖拽手势的处理函数。下面是该函数的代码:

- (void)pan:(UIPanGestureRecognizer*)gesture{
//Get the current translation on the X
float xOffset = [gesture translationInView:self.view].x;
//When gesture begin, reset the offset
if(gesture.state == UIGestureRecognizerStateBegan){
XPanOffset = 0;
}
//the distance covered since the last gesture event (I slow down a bit the final rotation multiplying by 0.5)
float movedBy = xOffset * 0.5 - XPanOffset;
//Calculate the offset from the previous gesture event
XPanOffset += movedBy;
//Add the offset to the current angle
angle += movedBy;
//Update the plane
[self animate];
}

拖拽手势是一个连续性的手势。从手势开始,直到所有手指离开屏幕之前,只要手指一移动,pan函数就会被调用。

为了将这些手势数据转换成对旋转木马动画有用的数据,我们需要获得每次移动前的X坐标值。

这里我们使用了XPanOffset这个变量来存储位置信息。当手势发生移动后,我们会计算出本次移动的距离(movedBy变量)。这个移动距离会被加到XPanOffset中,也会被加到当前的angle变量上。

然后调用animate函数就可以将所有平面旋转到新角度。

就这样,完成了!

这个简单的例子展示了只需用Core Animation就可以做出来的一些3D效果。

祝你玩的愉快!有任何疑问或建议,请随时在twitter上联系我。

教程源代码下载

译自:Think & Build